Saturday, October 18, 2014

Names, Names, Names

It only took a month...
 Sixth graders completed their radial name designs with analogous color schemes. The had to design a square, flip and trace it four times, outline the pencil lines in sharpie and color with analogous color scheme. Most of them came out AMAZING, and the kids were excited with the results. I wanted to show this one because it had a moment of problem-solving.. the student messed up his radial symmetry on the tracing stage and figured out how to cut it apart, rearrange, and reattach the quadrants to achieve radial symmetry.
 My seventh graders made their names pop out in one point perspective, shading the perspective lines for atmospheric perspective, and added backgrounds to increase the sense of space. I loved how James, above, put his name in a wrestling ring.
 These 2 were my superstars. Really good craftsmanship and creative backgrounds. Gabby's on the "road of life", and Gianna is a superhero...
 My eighth graders used Alexander Calder as inspiration for a name sculpture. They had to illustrate each element of art in their letters, than use hinges and slots to connect their pieces into a 3-dimensional work of art.
 Making the letters was excruciating.. some thought it was boring, others went over-the-top in their craftsmanship and took forever. But once they got to the sculptural stage they got way more into it and thought it turned out to be a really interesting project. They are all over the school now, and we've gotten lots of compliments.
It would be fun next year to maybe do this as a group project with one massive sculpture per class or grade....
My kids are settling into our routines and I've made some good connections- especially with my 8th graders (oh, I was so worried....). If the rest of the year goes this well I will be one blissful art teacher!

Saturday, October 4, 2014

One month in

So...Middle School rocks!
I am so happy in my new position. I have ENOUGH planning time to ACTUALLY DO MY JOB. This is huge, because in past years I had very little prep time and was staying after school for at least an hour or more every day to catch up on grading, photographing work for artsonia, and hanging work in the halls. I've even, for the most part, had enough time to write my lesson plans while at school instead of bringing them home over the weekend. I'm happy and my family is happy because they actually get to see me and I'm not super stressed out all the time.

Middle Schoolers are funnyyyyyyyy. I love my kids and their questions and stories and jokes, and generally behavior has been pretty good. I've only given one demerit so far, and had to yell only 2-3 times. I haven't cried out of frustration or exhaustion. I've laughed a lot and worked through some difficult behaviors with a good sense of humor.

Also in middle school, I can expect them to do a lot more with writing, vocabulary, and image analysis. We've got a routine going called "Quiet 5", where they come in, get their sketchbooks, and immediately get started on a quick warm-up activity. It's really helped with behavior and learning concepts. Just hearing me say something does not instill it in their brains. But writing things down, and drawing examples is working, and I can tell because of the quality of their written reflections at the end of projects.
Here's a glimpse of what's been happening in My Blue Art Room (which isn't blue anymore, but whatever, it's lilac now but I'm not changing the title of my blog, so plbbbt!):
My 5th graders made a name collage ala Ellsworth Kelly by collaging the letters of their name, measuring a grid, cutting the pieces apart, then puzzling and collaging them back together in a random way. They learned about contrasting and complementary colors, We also talked about emphasis. Not everybody got that, but the student who made the one above did! She added the black diamond to make her letters feel pulled into the center. I took all the squares from a class and combined them into collaborative displays like the one below:
 My 6th graders learned about radial symmetry and created these name mandalas. They first drew their name to fill a tissue paper square, then repeated it in all 4 corners. They also learned about analogous colors and selected a limited palette for their designs. I have them arranged in the hall to flow through the colorwheel.
 I haven't photographed any 7th grade projects yet, but we're doing 1 point perspective with their names. And 8th grade is reviewing the elements of art and using the letters of their names in a Calder-inspired stabile sculpture.
Here's a glimpse of what's coming down the pipeline: 5th grade colorwheel paintings, the grade 2 -pt perspective lego paintings, and 8th grade fake advertisements. Did I mention I actually have time to do things like make new exemplars?!!
And my favorite part is when my 8th grade portfolio prep group comes to visit me at lunchtime twice a week! We are currently doing pencil drawings of still-life objects. This crew is planning on applying to the Creative and Performing Arts High School which requires a portfolio audition, and I'm trying to give them time to prepare. They have to be done by  December, which will be here before we know it.
I miss my little guys at the elementary school, but so far so good with middle school kids. (as long as I can manage to keep a straight face)

Thursday, August 21, 2014

My world got flipped, turned upside down..

On Monday I headed into my elementary school to stat setting up for the year. This was the first year I was able to go in the week before PD to do so, and I was looking forward to an easy setup. After all, I'd left my room in a very tidy state in June. I started moving tables around...
 And then came the news... our Middle School Art teacher had resigned, and did I want to take on a full-time position? Of course I want to be full time... but that means moving up to Middle School!!
The perks: full time pay, only 14 classes and 350 students instead of 22 classes and 500 kids, a kiln, and a HUGE at room YES!!!!!!!
The drawbacks: It's middle school, I have to do a day of sub duty, it's middle school.... and I had 3 days to organize a huge room jam-packed with the former art teacher's years of squirreling away things wherever they fit.
I started off by pulling everything out of the closets and shelves, piling them up on the tables. I wanted to get an idea of what supplies and tools already were available. Some awesome finds included 5 sewing machines, 2 digital cameras, tons of easy-cut lino blocks, an 18inch square paper cutter, and 5 boxes of these dense foam geometric forms:
 Some weird finds included a billion rulers, countless rolls of architectural blueprints, and pieces of needlepoint canvas EVERYWHERE, and another billion plastic milk-jug bottoms for water cups and marker-holders.
Weirdest thing was that one unit of drying racks was mounted so high, no normal-sized human would ever be able to use it. I got the custodian to unscrew it and remount it under the window where it could actually be used.
 So now I've got the room arranged how I like it, with supplies stored in a logical manner. 4 giant bags of trash and 3 recycling bins filled with paper and plastic have gone out the door. This picture is from the doorway:
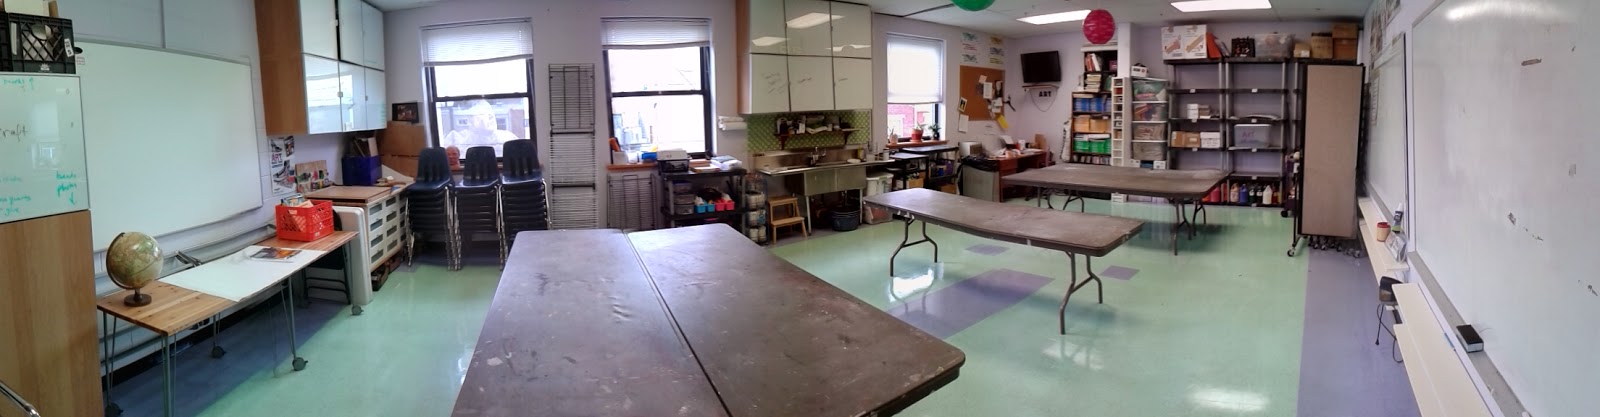
At left is a Promethean board and a long rolling table I  intend to use as a demo table and/or supply distribution space. In the left corner cabinets I'm storing paper, drawing media, and printmaking supplies. The counter top holds my paper cutter, and the drawers below have additional paper storage. I've got a mess of cardboard stuck in the corner ready for sculptural use. Drying rack is between the windows. A set of shelves is a supply station with rulers, compasses, whiteboards, crayons, oil pastel, magazines, and table supply caddies. A rolling cart is filled with tubs of colored pencils, fine and thick markers. Above the sink is all the painting storage with watercolor, tempera, water cups, brushes, india ink, etc. Another set of shelves holds clay tools, glazes, and acrylics. My still-messy desk is in the corner (haven't tackled that yet!!). There's a bookshelf stocked with text books I can threaten my students with. A stack of large bins hold fabric and felt, and there are 5... yes, FIVE sewing machines (happy dance). Three tall shelves are now empty and awaiting student art. Each class will be assigned a shelf. A rolling cart holds yarn and fiber supplies, a rolling shelf is holding art poster and large-size paper and boards. An expanding display unit awaits use as critique board, and 2 huge whiteboards stretch along the 4th wall. Small shelves under the boards are empty  and waiting for student sketchbooks. I have 5 long tables arranged in the center with a group of 2, a solo table, and another group of 2, so I can have a group of 10, a group of 5, and a group of 10. above the tables I hung 3 different-colored beach balls to identify table groups.

There is soooooo much more I'd like to do to decorate, and I haven't even touched the kiln area yet. However, at least I have a better idea of what supplies need to be ordered, and everything is placed where I want it. It is not cutesy, and I have no bulletin boards, but this is middle school.
I think I'm ready.........

Tuesday, July 29, 2014

The impatient art teacher's new apron (a tutorial)

Confession:  I cannot teach art without an apron on. There's a reason why certain professions have a uniform. Certain professions require appropriate clothing for safety and/or for identification purposes. I don't want to wear a complete uniform every day like my students do, but putting on my apron is like my uniform. It automatically puts me in a "ready-to-work" frame of mind, it protects my nice school-appropriate clothing (why can't art teachers where jeans and a t-shirt all the time????), and most importantly it gives me a place to put my hands and the random markers, pencils, erasers, glue stick, scissors, etc that I either need for demonstration or that kids pick up off the floor and hand to me. The previous art teacher at my school bequeathed me a lovely brushed cotton canvas apron in purple that I LOVE. Somehow he left it to me in near-pristine condition. I am a much messier art teacher than he, and after 2 years the bib has become so encrusted with paint and glue that I feel like I can't walk out of my room for fear they'll think some hobo got into the building. 
Needless to say, it's time for a new one. Then this past week, Cassie Stephens known for "What the Art Teacher Wore" suggested an apron sew-along project on our facebook art teacher group, and I felt inspired to just jump and do it. Another teacher shared a pattern for a crossover pinny style apron that I've been drooling over- I must have 5 different versions of it on my "If Wishes were Horses" board on Pinterest. But I'm an impatient person sometimes. I couldn't wait for Cassie's tutorial. I couldn't wait for the internet at Fleisher to work properly enough for me to find the pattern that had been shared. And I certainly couldn't wait to make a paper pattern first... who needs a pattern? I completed this project in the studios at Fleisher Art Memorial over the course of an hour and a half while my daughter attended their teen lounge.
Here you go. This is how to make a crossover pinny pattern based on estimated measurements and rectangles.
  • Select a heavyweight cotton, linen, or denim. Those cute patterned quilt cottons are too thin for a sturdy, protective apron. Make sure you have a piece wide enough to wrap around your chest from front to meet in back. The piece should be long enough to stretch about from your shoulder to your knee.
  • Cut about a 6-8 inch strip off the top of your fabric. This will become the straps.

making straps

  •  fold strip in half along the length, then fold raw edges in toward the center (like double folded bias tape). Sew along the open edge.

topstitch strap for studiness

  •  If desired, topstitch along the edge of the center fold as well so your long strip has 2 parallel lines of stitching down either side about 1/8 of an inch from edge.

1 long one becomes 2 shorter ones

  •  Cut the long strap in half to make 2 shorter straps. You may need to cut more off later to make sure they are the correct length. It's just easier to sew it as one long one first.

hem the big rectangular

  •  Next we finish off the edges of the big rectangle which will make the apron body. Turn raw edges under about 1 inch and turn under again. I like to use my finger as a guage. From fingertip to first knuckle is about an inch

the impatient person's ruler

  •  Turn one edge and stitch down about 1/8 inch from turned edge. I did the 2 selvedge sides first, then the top and bottom hems.

more topstitching

  •  Once all 4 edges are hemmed, topstitch around outer edge of entire rectangle about 1/8 inch from edge.

wrap around  to fit straps

  •  Once edges are hemmed it's time to attach straps. Wrap rectangle around yourself so edges meet at your spine. It might help to have someone help you hold that there.

finding strap locations

  •  Find and mark the points on the front where you would like to have your straps attached. I like mine about 4-5 inches from center, but they could be farther apart if desired.

doublecheck!

  •  It's a good idea to doublecheck your symmetry. Fold fabric in half and make sure your 2 strap points match and are equidistant from the center fold.

attach straps on front

  •  Fold one strap end up about  inch and line up end on back side of hem on top edge of fabric (important to remember if your fabric has a directional pattern!). The folded-under end should be hidden once sewn. Start at one edge and sew a square with an X inside, following previous stitching if possible,

 The stitched box makes a strong connection that is unlikely to tear if pulled. Sew across top, down side, across bottom, up side, diagonal to corner, across bottom, and diagonal to opposite corner. Whenever starting and ending seams remember to backstitch a little.
measure strap and attach to opposite back corner

  •  Check your fit. Have someone help you if possible. Wrap apron around you again, Take left strap over your shoulder and cross to right corner and pin. If it's too long cut it shorter, make sure both straps are cut to the same length. Make sure strap doesn't get twisted. Fold under end and sew to corner like before.

Other strap!

  •  Match right strap to back left corner. fold under edge and attach as before. Try it on! Your pinny might be done!! Or not...

Mine needed a dart

  •  My pinny felt too bulky under the arms so I decided to make a dart. I came in an inch and angled to fold so it would end just under the bust. I went vertically down the fold, but it could have been angled in towards the bust instead for a better fit. I marked the angle and sewed along the line on both sides of my pinny. The seam could be trimmed and ironed flat, or topstitched to one side.

missing something important

  •  Try it on and see where you'd like your pockets to go

 I think the proportions would be better on me with wider straps....

  • You'll need some extra fabric for pockets, either the same or contrasting fabric. Once I ripped back pockets off my dad's worn-out jeans to make pockets for an apron. You could make 2 separate square pockets. I went for one long rectangle pouch. 
  • Turn edges under about 1/2 inch and stitch down, just like when you hemmed the big rectangle apron piece. But don't topstitch the edges this time. The topstitching will be how the pocket is attached to the apron.

Pins needed this time!!!!!

  •  Doublecheck pocket placement and pin corners and centers of sides. Start at a top corner and stitch down side, across bottom and up side. At the corners it's good to do some extra backstitching. To turn the wide pouch into 2 pockets just sew a line up the center of the pouch. 

Ahh. Now I have a place to put my hands and all the random stuff that accumulates. These pockets are super deep. they're a little invisible, though because I lined up the print. It's so easy to slip on and off, and I don't have to worry about my strings always coming untied. This is a very forgiving pattern for size. I imagine it would be great for any art teachers going through maternity ( not me!! don't worry!). I like how far it wraps around me, and will protect my backside from those random flings of paint or kids who love to walk up to me with sopping wet paintings..

I've still got about 2 yards of this fabric left for further exploration. I don't like the bulk under the arm because of the very straight rectangular edge across the top. This style might hang better on a less curvy person than me. I also think wider straps would look better. I'm going to see what Cassie comes up with and maybe make a second one, or try the more curved patterns I've seen elsewhere. A pattern that dips down in an arm scye might work better for me. Also, having separate front and back pieces might be better, as a side seam would allow for some A-line shaping for a more gracefully-hanging apron.

At least I've got a new apron. Maybe now I'll feel in the mood for working on next year's curriculum mapping....

Sunday, July 13, 2014

Reflecting on new National Art Standards

The NAEA has rolled out the new National Art Standards to align with common core, and so far I'm very intrigued with the ways it can help me get a big picture of my curriculum and what I want my students to learn in each grade. I haven't explored them totally in-depth yet. I'm following along with the series of webinars the NAEA is hosting over the summer as my personal professional development. Tonight I downloaded the "at-a-glance" standards charts. It's a lot of information to absorb at once. So, being an artist and visual learner I thought I would play with some imagery to help myself understand all the concepts.
 First of all, there are 4 main activities students should be doing in art class: responding,creating,connecting, and presenting. These 4 activities are interdependent and cyclical, which is why I arranged them in the frame above. I selected the images on purpose For "CREATE", my Kinder Thankful hands image has a picture of the artist inside her hand on an abstract background- a project that involved painting, coloring, cutting, and collage, plus the HAND is essential for creating in my perspective. For "CONNECT" I used one of my 5th grader's self-portrait monoprints because the artist's eyes connect with the viewer and in that project students were connecting the history of self-portraiture with contemporary social media practice of taking selfies. For "PRESENT" I used an image of the first collaborative project I did with my students- a self-portrait mural in rainbow colors that took something small and individual and became huge and inclusive once they were all put together for display. For "RESPOND" I used a collage and embellishment image my 5th graders did last year which involved using someone else's artwork as a resource and which involved a successful group critique to determine best approaches for creating unity and emphasis.  So, these images have personal meaning for the context of the 4 aspects of art class.
 I went through the entire at-a-glance standards chart, which shows anchor standards for each of the 4 concepts. Each anchor has an "Enduring understanding", a big idea. I'm trying to see the big picture of my curriculum- what should my students understand and be able to do? What's the point of all these projects we do? How is it relevant? Why does your average individual in today's society need art education? What does it do for our society? Ok.. a little overboard there. But the enduring understandings are helpful. and not overwhelming. I took the enduring understandings under the category of "CREATE" and made some more collages. I like the 2 ideas in the one above- which basically come down to 1-people make stuff and that's an awesome part of being human and 2- you CAN and should learn how to be creative.
Then there were 4 more understandings under CREATE that seemed more concrete. When we make art we 1- play with materials, ideas, and the elements & principles of art, 2- we refer to and are part of flexible artistic traditions, 3-it's not just fun, and 4-you have to practice to get better.

I think I'll make more of these, maybe make them a little more aesthetically pleasing and turn them into a bulletin board for my room. It will help me internalize these ideas if I see them in my environment every day.
Sometimes the things I put on the walls in my classroom are for my kids, but a lot of times they are for me as a reminder to reflect on whether I'm following procedures and achieving the goals I set out to meet.

Friday, July 11, 2014

This year in 5th grade

Well, I know what I have to work on for next year. 5th grade.....
Whereas most of my grades completed 8 or more projects over the year, it looks like 5th only got through 6, and I only have pictures here of 4 of them...
Almost all of the projects focused on some part of identity. My major problems with 5th stem from them being soooooooooooooooooo talkative and not working enough, and me planning projects that were too long and drawn out for them to sustain focus on. Add into that my interns usually want to experiment with this group because they are the only class that I see twice in one day, giving an opportunity for practice with one group before being observed with the second group.
So here's a look at some things we did in 5th grade this year:

We learned how to use rulers and compasses to make non-objective art. We also learned about analogous color harmonies:
 We learned how to make a tessellation and ho to shade values in colored pencil:
 We learned one point perspective and how to creat a sense of space through color, size, and placement in a still-life:
 We learned how to make a monoprint and use color for expressive purposes in a "selfie":
We also learned how to sew and applique a quilt square, but sadly I have no pictures of this.

Up for next year:
-more routines
-shorter/smaller projects!!!

Monday, July 7, 2014

This year in fourth grade

I had a huge range of characters in my fourth grade classes this year- some amazing artists, some chatterboxes, and some kids who just didn't like art. I tried to persuade them that art was awesome and even if you don't think you can make art, you can! We go into more in-depth projects in 4th grade, and it seems like some of them drag on forever. So my 4th graders didn't complete as many projects as my lower grades. We did elements and principles of art, a huge unit on Medieval art, American art and landscapes, and finally figurative art. There's a lot I want to change for next year, but here's what we learned about this year:

We learned about the elements of art (line, shape, color, value, pattern/texture, and space):
 We learned about op art and geometric forms, but alas I have NO pictures of our awesome paper sculptures...
We learned about Medieval art and craft, the guild system, and the patronage of the church and did projects including manuscripts and armor:
 gargoyles:
 and stained glass:
 We learned about American artist Jasper Johns and focused on stte symbols and emphasis:
 We learned about the Impressionist art movement and pointilism to create landscapes:
 We learned about proportion in figures and how to create movement in an artwork:
We also made figure sculptures which I also failed to photograph....
I'm considering switching up how I do things in my upper grades to involve more choice to hopefully engage the range of interests. Maybe using choice boards- like do 2 out of these 3 options to show you know the material. I also want to build in more feedback and reflection into my assessment of the upper grades. It may involve using sketchbooks with 4th grade as well as 5th. Or building in more routines... I have to think some more.....